By the end of class students will become familiar with the phrase 'depth of field' (DOF) as evidenced by finding two photos with a shallow DOF and two with a wide DOF.

| 
|

| 
|
By the end of class students will become familiar with the phrase 'depth of field' (DOF) as evidenced by finding two photos with a shallow DOF and two with a wide DOF.
0 Comments
By the end of class students will understand the concept of a "stop" as evidenced by taking 3 photos, each with the same overall exposure, but by increasing the exposure by a stop in one setting, and decreasing the exposure by a stop in another setting.
1/160 5.6 800 1/80 5.6 400 1/80 4.0 200
By the end of class students will know the benefits of either raising or lowering ISO as evidenced by taking 2 photos with a really high ISO and 2 photos at a low ISO. (Be sure to adjust the overall exposure so that it is not over or under exposed.)
By the end of class students will know the consequences of raising and lowering aperture as evidenced by describing them.
Aperture is the effect of being able to switch the lence to open up to allow more light i n or close to not allow as much light in. By opening it, you manage to have the effect of more light but you can also focus on one subject and the background then turns blurry. by closing it you sharpen the whole entire image without having a difference in subject and background. By the end of class students will know the pros and cons of raising and lowering shutter speed as evidenced by describing them.
Raising shutter speed: pro: sharp image con: low light lowering shutter speed: pro: brighter image con: blurry image. By the end of class students will be able to identify the three components of exposure as evidenced by giving a brief description of each. +shutter speed door:
two little black lenses that only pen up enough to allow some light in. the more they open up, the more light there is in the pic +aperture: metal blades that you can open and close in order to allow more/ less light +ISO : Digital exposure booster that your camera can do By the end of class students will analyze several examples of portrait photographs and recognize elements of successful portraits as evidenced by comparing and contrasting the photos below as well as ranking them in the order of most successful to least. (Also, let's practice our recently learned touch up skills by improving photos C and D.) C Photograph C has been taken with just the right amount of light, the subject of the portrait looking at the camera an a not so busy background D person looking at the camera BUT busy background and harsh lighting.. overexposed A person is not looking at the camera, lghting coming from the top making the face look flat . B there's no good lighting, subject isnt looking at the camera and backgruonf doesnt help differentiate his face from he pic
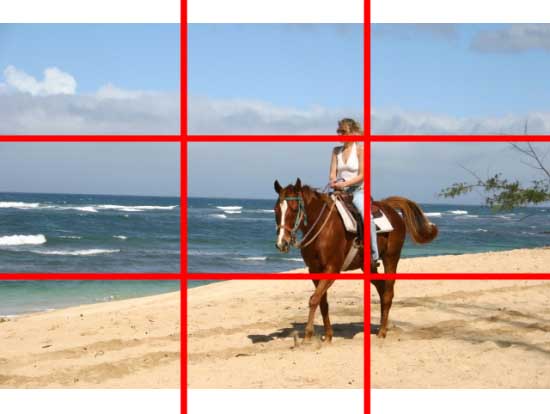
By the end of class students will understand the 'Rule of Thirds' as evidenced by finding 2 images that use the Rule of Thirds and 2 that do not.
By the end of class students will have a solid understanding of Photoshop basics - saving and opening .psd and working with multiple images - as evidenced by saving and opening a .psd and by taking a screenshot of 4 open simultaneously opened documents in Photoshop. 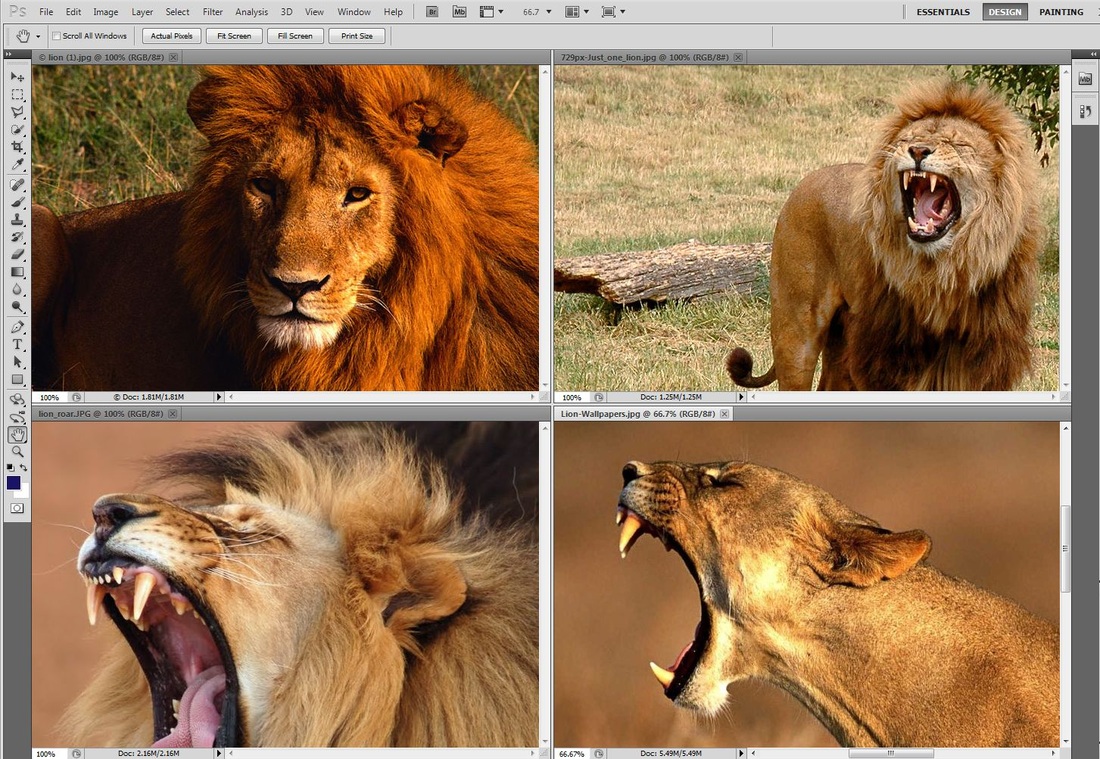
By the end of class students will be able to recompose a shot so that it has a clear Subject and Background as evidenced by writing 3 short paragraphs each about a different way to make the photo below have a clearer Subject and Background.  In order to make this image a clear subject and background photo, the photographer could change the location of where he decided to take his pictures to find a background that's not as busy with all the distractions behind the desired object. By changing the location, the photographer has facilitated the process of encountering the subject and successfully differentiating it from the background.
| AuthorWrite something about yourself. No need to be fancy, just an overview. ArchivesCategories |


 RSS Feed